Inside Croissant Mountain, Evil Takes Its Form.

Let’s say you are going to work on some meaningless (not to say useless) piece of string processing code. One good way to test it is to apply it on a huge set of strings. You can take some huge random text. You may also want to use a lexicon for problems like palindrome, isogram, blanagram or any funky word list generation.
Let’s pick a language at random… French!
Your favorite search engine will probably returns the word list genrated from the Francais-Gutenberg lexicon by Christophe Pallier (link). It’s a 3.6MB file containing 336531 french words.

Another alternative is to use the lexicon from the ‘Association des Bibliophiles Universels’ (link). Unfortunately there’s a file per letter. So you need to remove the licence and footer before concatenating them.

#!/bin/bash
for i in {a..z}
do
	wget http://abu.cnam.fr/cgi-bin/donner-dico-uncompress?liste_$i -O src/list_$i
	tail -n +60 src/list_$i | head -n -2 | cut -f1  >> words.DICO.txt
done

The generated file contains 289576 words.

Finally, you can use the Morphalou lexicon from the Centre National de Resources Textuelles et Léxicales (lien). Unfortunately, the lexicon is a 155MB XML file containing the list of inflected forms for each entry. I will not describe the XML structure here. Long story short, we will extract all the ortography tags and remove duplicates.

grep -in orthography Morphalou-2.0.xml | perl -pe 's/.*<orthography.*>(.*)<\/orthography>/$1/' | awk ' !x[$0]++' > words.Morphalou.txt

This wonderful one-liner generates a file containing 410940 words.
The awk ‘ !x[$0]++’ is blatantly ripped from this stackoverflow answer.

Malevitch can’t code!

Some months ago, Iq asked on Pouet bbs if anyone had some tip and tricks on creating a minimal glx framework.
Viznut answered that he managed to have open a window and refresh a framebuffer in 300 bytes using kernel syscalls.
So I jumped on the bandwagon and decided to code my own minimal X client using raw X11 protocol.
Here’s my miserable attempt. Looking at xcb and Xlib code helped a lot. Unfortunately it failed on half of the boxes where it was tested because of authentication.
Kernel_error tried to add it but he said it’s a pain in the harp.
Oh by the way, it’ll crash on x64… Here’s small article in french about the different syscall conventions. And you’ll surely understand why it’ll crash 🙂

IPS delivery (part 2)

Edit: The version listed in this post is buggy. Please consider using version 0.02 [link] or the current development version [link] instead.

Here it is! The gtk version of the ips patcher I wrote earlier.
It’s based on GTK. And I use Glade to create the interface.

I thought I’d have to implement zillions of callbacks but in the all I had to to is attach the IPS structure to the main window, implement a callback and add a thread.

This was also the occasion to clean up and simplify the IPS code.

You can download it [here].
Feel free to contact me or leave a comment if you have any request or problem.

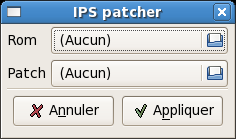
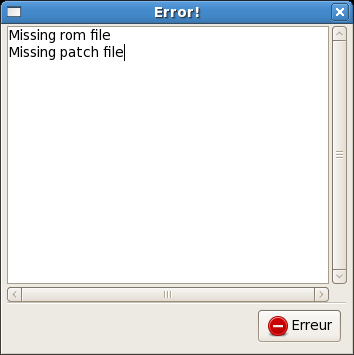
Here are the mandatory screenshots!

  • Main window :

    IPS patcher main window

  • Error window (it’s a little too big in my opinion 🙂 ) :

    IPS patcher error window

  • Success window :

    IPS patcher success window

IPS delivery

Edit: The version listed in this post is buggy. Please consider using version 0.02 [link] or the current development version [link] instead.

Today I wanted to try the translation of Metal Max Returns. This game looks really cool. As I’m super lazy, I ran the windows version of snes9x through wine. I haven’t tested the 64bit version yet. I realized that there’s no IPS patcher under linux. So once again I had to run a win32 IPS patcher (arkana ips) using wine.

I was wondering where there wasn’t any IPS patcher under linux… Maybe the IPS format is a real mess. In fact it’s the total opposite. It’s really simple.

I coded my own patcher in less than 2 hours (including testing). Here’s the quick non-documented code :

Here’s how you use it :
Usage : ips-patch ipsfile inputrom [outputrom]
ipsfile is the filename of the IPS patch to apply.
inputrom is the filename of the rom to patch.
outputrom is the filename of the patched rom. It’s an optional argument. If you don’t specify it, the input rom will be saved in inputrom.sav and then overwritten.

I’ll try to add some GUI later if I have enough motivation 🙂

Arduinosferatu

Months ago, I bought an Arduino. It comes with a nice ide but I always used it under Windows. This summer I decided to stop using Windows and I haven’t played with the Arduino since then.

Some days ago I purchased some stuffs from Sparkfun (some dataflash, resistors, etc…) in order to make some kind of backup device for the pc-engine. So I decided to install the Arduino softwares on my box. I’m currently running a Fedora core 7 for amd64. There are instructions for Fedora core 6 on Arduino site. But as I’m running on an amd64 I had to recompile some stuffs.

  1. Java
    There’s no official package for sun’s java on Fedora. Just follow the instructions from Jan K. Labanowski of the Computational Chemistry List, Ltd and you are done in less than 10 minutes.
  2. AVR tools
    It’s the easiest part. Fedora core 7 includes all you need. You’ll have to install the following packages:

    • avr-binutils.x86_64
    • avr-gcc.x86_64
    • avr-libc.noarch
    • avr-gcc-c++.x86_64
    • avr-libc-docs.noarch
    • avr-gdb.x86_64
    • avrdude.x86_64
  3. RXTX
    Arduino comes with a precompiled version of RXTX. Unfortunately it’s a 32bits version. You’ll have to recompile it or you’ll have some nasty messages when trying to run Arduino. Well, it won’t crash immediately. You’ll be able to set the program directory. But once you press OK, it will crash and you’ll get a nice error message.
    After trying to compile the CVS version of RXTX, I went for a release vesion. The latest one is 2.1-7r2. According to the INSTALL file, all I had to do was the standard “./configure; make; make install” combo.

    Unfortunatelly, the kernel headers test from the configure script failed. It’s trying to compile some piece of C code but. Here’s the error : error: 'UTS_RELEASE' undeclared (first use in this function) It seems that all distros are patching RXTX to remove the use of this variable. In fact it’s only used for a sanity check. If the current kernel version is different from the one RXTX was compiled for it will prompt some error message. If you really want to use it you’ll have to add the right header in the configure script (check_kernel_headers) and some various C files.

    I went the dirty way and simply removed it. Hopefully there’s a patch from the nslu2-linux project which will do the work for you on the sources. But you’ll still have to remove the check_kernel_headers() from the configure script.

    But that’s not the end of your problems! make install won’t work. You’ll have the following error :
    make all-am
    make[1]: Entering directory `//rxtx-2.1-7r2'
    make[1]: Nothing to be done for `all-am'.
    make[1]: Leaving directory `//rxtx-2.1-7r2'
    libtool: install: `x86_64-unknown-linux-gnu/librxtxRS485.la' is not a directory
    Try `libtool --help --mode=install' for more information.
    make: *** [install] Error 1

    Hopefully this issue is addressed in the RXTX faq.

    After installing RXTX, edit /usr/java/jdk1.6.0_02/jre/lib/javax.comm.properties (create the file if it’s missing) and add the following line :
    Driver=gnu.io.RXTXCommDriver

    We are now ready to run the Arduino software!

  4. Arduino
    The latest version is Arduino 0009. Install it wherever you want. Let’s say ~/arduino. When you are done go to ~/arduino/lib. Remove RXTXcomm.jar and librxtxSerial.so. Then edit ~/arduino/arduino and modify both CLASSPATH and LD_LIBRARY_PATH to point to the directory containing RXTXcomm.jar and librxtxSerial.so. Here’s what it looks like on my system :
    CLASSPATH=java/lib/rt.jar:lib:lib/build:lib/pde.jar:lib/core.jar:lib/antlr.jar:lib/oro.jar:lib/registr
    y.jar:lib/mrj.jar:/usr/java/jdk1.6.0_02/jre/lib/ext/RXTXcomm.jar

    LD_LIBRARY_PATH=`pwd`/lib:${LD_LIBRARY_PATH}:/usr/java/jdk1.6.0_02/jre/lib/amd64:/usr/lib:/usr/local/l
    ib

    At this point we are nearly done. Don’t forget to give your user the permission to the usb device (/dev/ttyUSB0 in my case). Plug the Arduino board and launch the ide. There’ll be some gcc warnings. Don’t pay attention to them.

    First set the serial port. Go to Tool > Serial Port and choose the correct interface. If you don’t know it, leave the menu and unplug the board. Go to the Serial Port menu and note the currently listed interface. Replug the board. And return to the Serial Port menu. A new usb interface may have appeared. It’s the interface the board is connected to.

    You’ll have to check if the ide is set to the microcontroller. If it’s not the case when you’ll want to upload your code to board, you’ll have the following error:
    avrdude: Expected signature for ATMEGA168 is 1E 94 06
    Take your board and look for the chip type. You can’t miss it, it’s written on it 🙂 To change the microcontroller go to Tools > Microcontroller (MCU) and choose your chip (ther’s an ATMEGA8 on my board).

    At this point everything should be alright.

Captain’s clog

Aouch… 3 months since last post.
A lot of things happened. First of all i changed job (who said lame excuse?). Then GGI was selected for google summer of code. Guess who is the GGI admin on gsoc.. me :). 2 projects from the idea list were “slotted”. This means that google will fund them. The project i was about to mentor wasn’t selected. Anyway, i hope everything will be alright because some of the selected projects are part of the 3.0 roadmap.
Still about GGI, my current task is to implement Xdbe helper for X target. The task is not easy as it seems. My first try was kinda simplistic and … buggy. Instead of increasing X target speed, it slowed it down. And worst of all, i totally misunderstood the goal of Xdbe helper. It’s not just about swapping the window drawable. In fact, it’s the last and final part of the job. For the moment in X target, all the drawing operation are performed on the window drawable. Multiple buffering is performed by using window clipping. Let’s say we want a visual of 320×240 pixels and 3 frames (in order to do triple buffering, or whatever). We create a parent window with a size of 320 by 240. Then we create a child window of 320 x 240*3. We display a given frame by moving the child window so that the required area becomes visible.
For example, if we want to view the second frame, we move the child window by (0,240).
Back to Xdbe. We don’t need to use window auto-clipping anymore. We can use a single window with a backbuffer attach to it. If we want multiple frames, we can create a pixmap the same way we created the child window or create a pixmap per frame. All the drawing operations will be perfomed on the pixmap. Then on flush, we copy the pixmap data to the backbuffer and swap the window. It’s not as easy as it sounds because i’ll have to reorganize (or completly rewrite) the X target.

On the crbn/ray tracing front. There’s not much coding going on but i’m reading a lot… Ok. Let me rephrase it… I have a lot of papers and books to read 🙂

The pcengine tracker development was resumed this week. I hope to release a test rom for the instrument editor before the end of the month.

And now something different. Yesterday (and today) i rewrote the gallery with javascript and css. The old one was in perl/cgi and had a small oneliner. I still have the code lying around. I’d better burn it for the sake of mankind 🙂 However the only dynamic part in the new one is the image display in javascript, and as i now have this wonderfull blog, i threw the onliner away.
I put a link (“Doodles, drawings, sketch dump…”) to it in the section “My other stuffs”.