Alice’s bubbles (Part 2)

Oh hy! I didn’t notice you were here. Please take a seat.
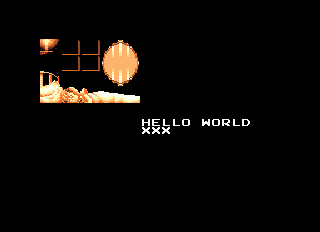
So I were talking about the font. As shown in the following image, the original font already contained uppercase letters.
Marchen Maze original font
As I wanted to add lowercases and some punctuations, I had to find where and how the font was stored in ROM. The visual editor told me that the font was stored from $7300 to $7a10 in VRAM. So under the code debugger I set an aux write breakpoint (ctrl+w) to these addresses. The breakpoint was triggered at $f7c6 on :

TIA $3740, $0002, $0020

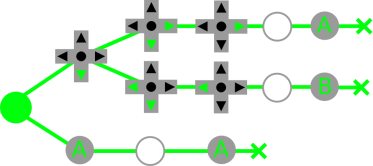
If you look closely at the following image, you’ll notice that there are 2 similar preceding occurrences. This is it! You are looking at the piece of code in charge of decompressing the tile data into VRAM. Mednafen debugger view
This code supports 4 kind of compression:

  • The tile is filled with 0.
  • Uncompressed. The data is directly transfered to VRAM.
  • Simple RLE encoding.
  • Simple RLE encoding with some kind of postprocessing involving XORing consecutive lines.

Laziness told me to avoid writing a little tool to compress the font. So I checked how many uncompresserd char were used and if it was enough to store lowercases. Hopefully there was enough room for all of them. Marchen maze brutal lowercases insertion

At this point I had nearly everything I wanted. There were no need to modify the string display routine. Most of the work done would have been done by the script encoder as the lowercases characters where not contigous. It was not a big deal. Nevertheless I wanted to check if there will be enough room for the translated texts and how much characters could be displayed per screen. Basically you had 16 characters per line and 7 or 11 line depending on the screen. This gave me an idea of the maximal script size. Unfortunately it was too big. So I looked for a fast/small/simple text compression/decompression for 6502 based cpu. I had a quick look at the romhacking.net forum. And it seems that one of the most used technique is DTE (Dual Tile Encoding). It’s a pretty simple approach. A text does not use all the ascii values. Basically you only use upper and lowercases (52 chars), numbers (10) and a dozen punctuation marks. This leaves you with 182 unused values. You can use them to store couples of characters. Bytes with values between 0 and 74 represent a single character and all the others represent a tuple. For example 182 represents ‘ab’, 183 ‘en’ and so on. Here is quick example: Let’s compress the string “abcacbabcabcabba”. First we extract all the characters couples and count them:

  • ab : 4
  • bc : 3
  • ca : 3
  • ac : 1
  • cb : 1
  • ba : 2
  • bb : 1

“ab” is the tuple with the highest occurence. We insert it in the symbol table: a,b,c,d=’ab’. And let’s replace it in the original string:“dcacbdcdcdba”. DTE only works on the original symbols. So in the second pass we must avoid the newly inserted symbols. The remaining tuples are :

  • ca : 1
  • ac : 1
  • cb : 1
  • ba : 1

The new symbol table is : a,b,c,d=’ab’,e=’ca’,f=’cb’,g=’ba’. In the end “abcacbabcabcabba” becomes “defdcdcdg”. The tricky part is to choose the right substitution sequence that will lead to the smallest possible string. It’s a whole new game and you can stick with choosing the tuple with the highest occurence.
Let’s get back to Alice. I grabbed the infamous lorem ipsum and made a script out of it. I compressed it with DTE. And I still had a lot of unused values. Remember the second pass of our example when I excluded the newly inserted symbol for the occurence counting. If I included it, DTE would in fact have been what is called BPE (Binary Pair Encoding). Here’s the mandatory academical reference : Byte Pair Encoding: A Text Compression Scheme That Accelerates Pattern Matching (1999). Using BPE we would have had for “dcacbdcdcdba”.

  • dc : 3
  • ca : 1
  • ca : 1
  • ac : 1
  • cb : 1
  • bd : 1
  • cd : 2
  • db : 1
  • ba : 1

Let’s add “dc” in the symbol table a,b,c,d=’ab’,e=’dc’. We now have “eacbeedba”. BPE is basically a recursive algorithm. So when we are decoding a string, we must check if it’s part of the tuple symbols (let’s call them “special” symbols). If that’s the case we will have to loop until the decoded symbol does not contain any special symbol. If speed is a concern we may limit the depth of recursion. This means that when we must take the depth of each symbol into consideration. For example imagine we have 2 tuples “dc” and “ca”. Both have the same number of occurence in the string. We may choose “ca” instead of “dc” because it only contains “base” symbols.
Using BPE the “maximal” script was small enough to fit. I made a silly test using some part of Hamlet (here’s the script). You can find the BPE compression/decompression as long as code for generating IPS files in this [archive].

Next : Levels names. Shitty part : they are sprites. Describe pointer tables and all.
All compressed. So I can’t avoid it anymore. Describe the compression scheme.
Got help for level name translation. (show the level names and their translation).
As I have a compressor, reworked the font so that it more or less match ascii. Had to spot where the font was rendered to vram. (link to final font). Simplify script encoder and display routine.

Coming next: Level names. A world of pain and horror!

Alice’s bubbles (Part 1)

Marchen Maze title screen
Or more humbly, the awesome Märchen Maze translation postmortem. It’s more or less a compilation/addendum for this pcedev forum [post].

Märchen Maze is a PCEngine HuCard game released by Namco the 11th of December 1990. It’s a conversion of the 1988 arcade game. It was also ported to the almighty Sharp X68000. As you may have guessed the X68000 version is a near perfect conversion of the original arcade game. It features some jolly 3D isometric view and colourfull introduction. Well, things are not that fancy on the PCEngine version. The 3D isometric view was changed to a top view (à la Mercs or Commando). And the intro is now in sepia tones. What about the story and gameplay? Check the Video Game Den review [here].

Ok! Back to business.
The PCEngine has some neat RPGs. Unfortunately only a few of them were translated into the idiom of the perfidious Albion (English). This was a perfect excuse for trying out that black art called romhacking. Monster Maker was my first choice. I must admin that cdrom games are not a really good choice for your first romhacking experience. A HuCard game is far more simpler to hack. So I went for Momotarō Katsugeki. It’s a cool platform game with tons of text. Unfortunately the text is displayed top to bottom and from left to right in bubbles. It was clearly out of my league. So I asked some people if they knew some easily translatable games. I can’t remember who suggested it. But Märchen Maze was designated as it doesn’t have too much text and no apparent string compression.

The first thing I had to do was to find where the text was stored in the ROM. After hours of pain, David Shadoff took pity. And like a mighty wizard, he managed to extract the whole script in no time. So I had the rom location of the strings. All I had to do was to put read breakpoint in Mednafen. I was able to locate the text output routine ($87D6). The string “parsing” was spotted from $89E5 to $8CD8 using step-by-step debugging starting from the the output routine. It made me realized that $5C,$5D held the pointer to the string to be displayed. The parsing routine was called from $E377 using jmp ($202C) instead of jsr. The return address was pushed by hand onto the stack. Here’s an snippet of the parsing routine. $ff is a special value. More on this later.

l_89e2: LDY     $271b
        LDA     [$5c], Y
        CMP     #$ff
        BNE     l_89ee

The most important information was that I now knew the zero page location holding the string pointer. Setting a write breakpoint to $5C:$5D led me to $8C4B.

        LDA     [$52], Y
        STA     <$5c
        INY     
        LDA     [$52], Y
        STA     <$5d

I was lucky because what precedes told me where the string table was.

        LDA     #$00
        STA     <$64
        LDA     #$56
        STA     <$65
        LDY     #$0c
        LDA     [$64], Y
        STA     <$52
        INY     
        LDA     [$64], Y
        STA     <$53
        LDA     $2716
        ASL     A
        TAY     
        LDA     [$52], Y
        STA     <$5c
        INY     
        LDA     [$52], Y
        STA     <$5d

So $5c:$5d is set using the data pointed by $52:$53 indexed by $2716. Let’s put $2716 aside. This is clearly the string index. So $52:$53 contains our string pointer. And the preceding lines tells us that the string table address is stored at $560C. A quick revealed that the string table was stored from $5614 to $5849. If we translate the address, it’s at the file offsets $11814 to $11A49 (this is with the annoying 512 bytes offset). Now that I had the string pointer table, I could make it point to whenever I want (technically). So the translated texts may not have to fit into the original string locations. I checked that I got it right by swapping the pointer table entries. And as expected the intro started with the second text and so on.
A quick look at the tile vram showed me that the font already contains capital letters. So I decided to manually edit the ROM and managed to get this:
Quick hack

The next step was to modify the font in order to have lowercase letters.
To continue…

Alice in GitHub

Some of the stuffs I posted here are now on [GitHub]. Namely, the and the [ips patcher]. Feel free to clone them 🙂
I’m taking a little break from OpenGL stuffs and the pcengine tracker. To relax I’m working on Marchen Maze translation. I’m nearly done with the introduction. I’m currently working on the insertion software. But I need to find someone to translate the script… Anyway you can check my progress on [pcedev].

And for more useless stuffs you can check my [twitter page].

Fireballs of fire!

EEK! 6 months !

It’s not that I had nothing to write. On the contrary, I have a lot to post. I just didn’t found the time to write… Erm.. Let’s go with a 7 months old stuff.

While working on the tracker, I wanted to add some kind of “live” mode. The user could choose which sequence to play, modify it, control volume, add an effect etc… So I came with the idea to associate a command to a key combo.

Combos are detected by walking down a tree. Each time a button is pressed, we look at the current node and check if one of its children is associated to this button. If that’s the case, this child becomes the new current node. Otherwise there’s no matching combo and we reset the current node to the tree root. If the button pressed didn’t not changed for a certain amount of time (timeout), we check there’s a child corresponding to the current button. This way, we can detect combo containing a sequence like “press A button during t seconds”.

Let’s look at a simple example.

Mkit will successively return : DOWNDOWN+RIGHTRIGHT0 (aka nothing) – A

We have 0 because when you go from RIGHT to A, there’s a moment when you don’t press any button. And as we check keys every vsync, we necessary get 0 (unless if you are Superman on Redbull).

Consider we want to handle the following combos :

The combo tree is very similar to a lexical tree. A node can have 0 to N children but only one parent.

The tree is store in level-order with the longest path first. This means that you’ll have to be very careful and store node children by their depth. We have for our example :

Root – Down – A – Down+Right – Down+Left – Nothing – Left – Right – A – Nothing – Nothing – Leaf – A – B – Leaf – Leaf

In the current implement, the tree is stored in 2 arrays. The first one contains the index to first child of a node. And the second the key for each node.

combo_tree : 1, 3, 5, 6, 7, 8, 9, 10, 128 | 2, 11, 12, 128 | 0, 128 | 1
combo_keys: .db 255, JOY_DOWN, JOY_I, JOY_DOWN | JOY_RIGHT, JOY_DOWN | JOY_LEFT
.db 0, JOY_RIGHT, JOY_LEFT, JOY_I, 0, 0, JOY_I, JOY_II

The root is always at index 0 and we associate the key value 255 to it.
The tree traversal algorithm is very simple. For a given node i, we know that its children are at indices j from combo_tree[i] to combo_tree[i+1]-1. And that we can reach them only if the current key is combo_key[j]. If the bit 7 of a value in the children list is set, this means that we have a transition a leaf. The remaining bits are used as an index to a jump table.
The traversal looks like this:

i // current node index
for(j=combo_tree[i]; jCOMBO_DEFAULT_DELAY in combo.asm). Note that in current code combo_tree, combo_keys and combo_jumpTable are in RAM. So you’ll have to initialize them before-hand.

If you have any question, feel free to leave a comment or go and join the [PCEdev Forum].

Talking about web stuff, I finally updated the gallery. Hurray!

Double Bit Dragon

In my quest for demo effects I’m studying zoom. 2 days ago while looking at the code for right shifting signed bytes, I realized that this technique can be used to “double” a byte.

Here’s a little schema showing byte “doubling”:

b0 b1 b2 b3 b4 b5 b6 b7

b0 b0 b1 b1 b2 b2 b3 b3    b4 b4 b5 b5 b6 b6 b7 b7

How can signed byte bit right shifting can help us?
Signed numbers are represented in two’s complement. I won’t explain it here. But when you are shifting a negative value to the right the most significant bit is replaced by 0. However this bit is always 1 for negative values. A way to solve this issue is to use the right bit rotation instruction (ROR) instead of the right bit shift instruction (LSR). ROR shifts the bits on position to the right. The carry flag is shifted to bit 7 and the bit 0 is shifted to the carry flag. We must copy the value of the 7th bit to the carry flag. We’ll use the CMP for this. The carry flag is set if the value in the accumulator is equal or greater to the compared value. So comparing the accumulator to #$80 (128) will do the trick.

We’ll use this technique to “double” the bits. First we shit the source byte to the right. The least significant bit will be in the carry flag. Then we rotate the accumulator to the right. The carry flag is then shifted to the 7th bit of the accumulator. We compare the accumulator to #$08. The carry flag is now equal to the 7th bit of A. Rotate the accumulator to the right one more time. Et voila! 🙂

This macro reads a bit from the source byte and adds it twice to the destination.

doubleBit .macro
    lsr <__src
    ror A
    cmp #$80
    ror A
          .endm

And finally here’s the code to “double” a 8 pixels long line. You’ll have to repeat it for each lines. If you want to double a tile on pc-engine you’ll have to call this of code for each “line” (32 times).

    cla

    doubleBit    ; bit 0
    doubleBit    ; bit 1
    doubleBit    ; bit 2
    doubleBit    ; bit 3
    sta <__dest

    doubleBit    ; bit 4
    doubleBit    ; bit 5
    doubleBit    ; bit 6
    doubleBit    ; bit 7
    sta <__dest+1

We now have the basis to make a complete zoom-in routine! 🙂

8bitranger! Tornado blast!

Some months (nearly a year) ago, i made a post about etripator. It’s a pc-engine rom disassembler… At that time the code was pretty ugly. Except the csv file reading and other utility functions, all the work was made in a single C file and (worst of all) in the main function. Well some people started to test it and asked for new features.
You can easily imagine that as soon as i added new features, the all code became a real mess. If i didn’t want it to become unmaintainable and buggy as hell, i had to clean it up and start thinking seriously about its design. That’s what i did during my summer vacation. After a week of mad coding and testing, what first started as a toy looks more like a real usable program now.

Ladies and gentlemen! I’m pleased to announce the first official release of etripator!

The previous test releases can be found here.

I would like to thank tomaitheous, Charles MacDonald, B.T Garner, David Shadoff, all the punks on #utopiasoft and necstasy.

Expect more releases. Mainly because it was not heavily tested and it needs some polishing (especially the documentation. The ReadMe file I wrote sucks.).

Typo negative

I cleaned up the 5×7 font rendering routine. It now uses mkit macros and variables. Here’s a little example of how to use it:

; set string length
lda    #28
sta    <_al

; set string pointer (don't forget to map it before)
lda    #low(string)
sta    <_si
lda    #high(string)
sta    <_si+1

; set vram address where the font will be rendered
lda    #$00
sta    <_di
lda    #$10
sta    <_di+1

; Here we go!
jsr    print5x7

; You can set BAT using the zp var _block containing
; the number of 8x8 bloc written

The code contained in the archive doesn’t need mkit as all the needed macros and variable declarations are included. If you want to use the font rendering with mkit, you’ll only have to include print5x7.asm and font.inc. font.inc contains both the standard 8×8 font, the 5×7 font and datas needed by the font routine.

You can download the archive [HERE].

Shrinked the glyph

I made some mockups for the tracker interface using tile studio. It helped me realize that the standard 8×8 font might be too big. Here’re test images for the instrument and waveform editors.


Instrument editor interface

Waveform editor interface

As you can see, the 8×8 font used in the instrument editor menu is too big. The screen is 320×224 wide and i need to have an area of 256 pixels for the sequence editor. So one way to space is to use a smaller font. I decided to use 5×7 font. But there’s a problem. It’s easy to use 8×8 font as pcengine stores background graphics using 8×8 tiles. And these tiles are displayed using an array (a map). So if you want to print text, all you have to do is to store the font in VRAM and then set the map so that it points to the correct 8×8 tile. The code looks looks more or less like this (in fact it’s a little more complicated or pcengine) :

for(i=0; i<strlen(str); ++i)
{
    tile[x+i][y] = mapBaseAddress + 8 * ((x+i) + (y * W));
}

On the other hand, you can’t use the background tile map for 5×7 as it doesn’t fit the 8×8 boundary 🙁 So all we have to do is to render each text in vram. We’ll have to brutally concatenate bits.
In order to keep things a little bit optimized, i decided to unroll the concatenation loop for 8 iterations. Why? Erm… A little example will explain it better than i will.

byte 0: a0 b0 c0 d0 e0 a1 b1 c1
byte 1 d1 e1 a2 b2 c2 d2 e2 a3
byte 2: b3 c3 d3 e3 a4 b4 c4 d4
byte 3: e4 a5 b5 c5 d5 e5 a6 b6
byte 4: c6 d6 e6 a7 b7 c7 d7 e7

This table represents the output of the concatenations of 8 five bits values. We may repeat this for every 8 characters in the string and we’ll be done … 🙂 The following 2 images show the same string rendered with 8×8 and 5×7 fonts (clic them for a x2 zoom).


8x8 font example

5x7 font example

Here’s a marvelous rom demonstrating this breakthrough in computer science 🙂

8bit archeology

Some years ago, i wrote a very simple and stupid pcengine disassembler in order to check if the rom i produced with wla-dx were correct. Well, time fly and two weeks ago i dig it from the grave. The user can now specify which part of the pcengine rom will be disassembled (code section) and which one are pure data. For this i’m using a csv file. The whole thing is discribed in the README file i quickly wrote tonight 🙂

I started coding it under Linux. As i was in a hurry and lazy, i decided to mmap the rom file. But unfortunately, mmap is not supported/implemented by mingw32. So i had to use my mighty google skills (well koders ones in this case). And the same thing happened with the CSV file parser. I’m using strndup and… i had to recode it :/

Enought ranting! I put everything THERE . The directory contains the complete source code, makefiles for both windows and linux, windows binary and the dev C++ project. As an example, i disassembled Momotaro Desentsu Turbo . I started to document the reset interrupt.